ProfiCook PC-WKS 1167G Tuya-free with Tasmota or ESPHome
Our kettle died.

While not a real priority for me, my partner raised a prio 0 ticket. So we did proper requirements engineering to purchase a new kettle.
Requirements:
- heats up water (too obvious?)
- is cordless (water tank can be removed from power supply)
- has at least 65 °C and 100 °C
- either WiFi, Bluetooth or RJ45 and somehow accessible from a browser/console
Based on ProfiCook PC-WKS 1167G 1.5L Kettle (501167) Configuration for Tasmota (blakadder.com)
it seems to be possible to free it from the unpractical Tuya system and
integrate it into Home Assistant (HA) or any other MQTT capable system. And in my POV it's pretty stylish, comes with the tea filter and is easily cleanable. If the top could be opened with the thumb to refill it using one hand only it would be the perfect product, but still it is great, fast and the price is reasonable.
![]() You are handling mains. Disconnect from power supply before you open, follow the local regulations.
You are handling mains. Disconnect from power supply before you open, follow the local regulations.
You need:
- a Proficook PC-WKS 1167G Kettle with TYWE3S respectively a real ESP. Watch out, Tuya changed at some point to Realtek chips. Obviously they got hacked already but this manual does not apply to Realtek
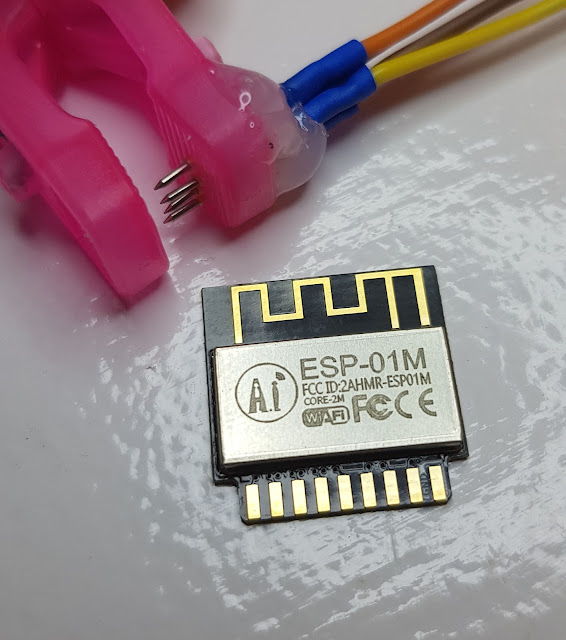
- a (pink) programming jig
- 5 pogo pins
- some cables
- a soldering iron
- a hot glue pistol and some pink hot glue (a white/transparent one may work, too :-)
- a FTDI programmer
- Tasmotizer, esptool.py or any other esp 8266 flash tool
- a screwdriver that I have no clue how to describe, you will see it when you turn the kettle around. For some reason I had the fitting one
- ~ an hour up to 3 hrs
- patience and the will to retry the last part, flashing it (maybe even more then 10 times)
First issue is to connet the ESP8266 in it to your programmer as I did not want to solder around the device for skill and warranty reasons. As the blakadder site was not very helpful in how to flash the ESP I continued my research and found a reddit where storytime42, OP of said reddit and most probably the first person to hack it, explained his approach and mentioned a programming jig from thingiverse. I asked a good friend with a 3D printer to print me the TYWE3S (that's how Tuya calls the ESP) programming jig, purchased a set of P75-E10 pogo pins (spring-loadad pins) from Vokolo.cz which arrived 2 days later in my letterbox. BTW, Zuzana from Vokolo is just great, if you purchase your pins there and enter NODeeJay in the coupon field (not case sensitive) you just get an unconditional 5% discount for Arduino, modules and parts! She also offers larger quantities than 10 pcs for better prices.
Meanwhile the programming jig was printed, it took a bit longer because I wanted it in pink. Pink programming jigs work much better than other colors :-), see also my post about the ESP-01M "kolíček" programmer.

Time to put it together:
Be careful when you solder the pins to the cables when the pins are in the jig that you do not destroy the jig by making the holes larger than they should be. I soldered quickly at 290 °C and fixed the jig with each pin with tape before.


The jig and connection to PIN 4 of the TuyaMCU I fixed with clothespins.
- Connect your FTDI to the cables on the jig,
- connect PIN 4 of the TuyaMCU to ground,
- connect the BOOT PIN (GPIO0) of the ESP to ground and
- power it with 3V3 through the FTDI by plugging it into your computer.
- You will hear fast beeps and the LEDs of the kettle flash in the same rhythm. Remove the GND connection from the BOOT PIN after 3-5 seconds
I had to restart the process more than 10 times before I caught the right moment the ESP goes to BOOT mode. When you hear the fast beeps you are close, don't give up, take a coffee and try again, at some point you reach the magic timing and it will flash.
You can also use esptool.py, but you need to make sure to set the flash mode to DOUT, otherwise you may create one of these bricks. The command line is:
esptool.py -c esp8266 -p [USB PORT] -b 921600 write_flash --flash_mode dout --flash_size 1MB 0x0 [IMAGE TO FLASH]
Product image is property of Clatronic International GmbH


Comments
Post a Comment